Pages

Showing posts with label tutorial. Show all posts

Thursday, June 6, 2013

Super Hero Owls

Spider Owl and The (Owl) Flash
This one is not so much something that we've done at work, but rather, something I decided to do in my own time and post here because it has great potential (perhaps with some modifications) to be applicable at work.

I designed some owls that had the main features of well known superheroes in my little ideas book and decided I might like to make them out of layered paper or cardboard. Awesome idea, I know. But when I looked at my stash of coloured paper and card there was a distinct lack of the appropriate colours. Except for Iron Man (pictured below). I hadn't really I wanted to outline each piece in the black, but it became necessary when I realised that the distinction between the read of his body and the red of his wings just wasn't there.


So there is idea number one of how you could use this craft: Create paper/cardboard owls. Perhaps to put on cards?

Undeterred by this minor set back in my plan, I decided to pull out the felt, recalling the utter cuteness of the Kokeshi Dolls we'd done at work. I did up some templates for the pieces of the basic owl which can be downloaded here. This does not contain all the piecess required for the superhero owls I have made (and planned) however, many of the pieces not included can be easily drawn up yourself.
So Here's What You'll Need:
  • Basic Owl Template
  • Felt in assorted appropriate colours for your owls
  • Embroidery threads that match your felts
  • Scissors
  • Cardboard
  • A pencil (I use a large 6B, but you may want a white pencil for the darker colours)
  • A needle
  • And Fibre Fill (stuffing)
Process:

  1. Print and cut out the pattern pieces. You may wish to glue the pieces to the cardboard to cut them out, or you can trace around the paper onto the cardboard to make the templates.

  2. Trace around the templates onto the appropriately coloured felt and cut out. Remember to flip the wing piece when tracing it the second time so that neither of your wings show the trace marks. Always place the traced side down when assembling
  3. Place the pieces together in the formation you wish to make
  4. Stitch the smaller pieces onto bigger pieces and then onto one body. (For example: I stitched the bat onto the yellow background before stitchin onto the back. I stitched the "pants" piece straight onto the base and then stitched the yellow belt into both. I stitched the eye pieces together and then stitched around the outer eye when attaching it to the body.) You'll need to use a small running stitch - simply up and down - for this.
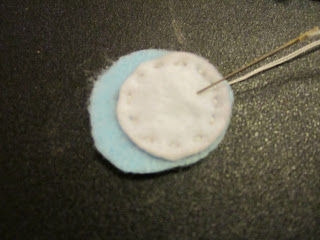
  5. Once the front of the owl is assembled, attach it to the back using a whip stitch. To do this you will start at the wing tip, insert the needle through all layers of felt, pull all the way through, bring the needle all the way around to the same side you started at and repeat the action all the way around the top of the owl and down the other side until you reach the other wing tip, leaving a gap between the wings for stuffing.
  6. Stuff the owl. Make sure to get right up into the tips. It may be useful to use a pencil or scewer to aid in this step.
  7. Sew the opening closed using the same whip stitch and bind off.
Bat Owl

 Aaaand here's my Avenge-Owls all Assembled!
Avenge-Owls Assembled: Captain AmericOwl, Iron Owl, Owl Thor, and Hulk Owl
 
This craft would be good for a little sewing club for beginner sewing with the kids, or alter the composition slightly to make it friendlier for all children. And remember you can design your own owl characters. What about Disney Princess Owls? Or just your own owl characters all together!
 
Kid Friendly Alternative to Sewing the Peices Together:
 
Hot Glue. Yes. The faithful hot glue gun could easily be used to stick all the pieces together up to and including attaching the front to the back. Glue around the eadges of the back and attach the front by pressing it down, making sure to leave the gap. Once the glue is cool, have the children stuff it and then glue the remaining gap closed.
 
 
Remember, if you do this craft, I wanna hear about it! And see it!

Thursday, May 30, 2013

Paddle Pop Harmonicas

This has to be one of my all time favourite crafts I've discovered. It's a little difficult to get right at first and many of the younger kids will require a lot of assistance, but the end result is well worth it. It's perfect for a music themed day/week - because its an instrument - but can also be used for a science theme, since it's a great example of how how sounds are made.

What You Need:


  • 2 paddle pop sticks
  • 2 small rubber bands
  • 1 large, wide, flat rubber band (It's important that it is wide and flat. I've tried with the regular thin ones and they just don't work. The ones I use are between 0.5 and 0.7 cm wide)
  • paper
  • tape
  • scissors
Constructing Your Harmonica:
  1. Cut two little strips of paper. (Mine are 2cm x 5cm, but they just need to be wide enough that you tape doesn't hand off the edges and long enough they they go around both paddle pop sticks with a little overlap)
  2. Place one paddle pop on top of the other and wrap the piece off paper around each end of the sticks, tapeing them to hold the right size.
  3. Slip one stick out and set aside for a moment.
  4. Stretch the large, wide rubber band from one end of the stick with the paper on it to the other as shown below:
  5. Sandwich the paddle pop sticks together once more and wrap the smaller rubber bands around each end of the sticks, ensuring they are bound together securely. Make sure these rubber bands do not catch the paper beneath them. 
  6. Blow! Place the centre of the harmonica between your lips and blow. If you're successful you will hear a buzzing, kazoo like noise.
HINTS, TIPS AND WARNINGS:

HINT! You can change the pitch of the noise by altering what we musicians call embouchure (Yay! Technical words!) which is basically the use of facial muscles and the shaping of your lips, along with the speed at which you blow the air out. Tighten lips and blow faster for higher notes. Loosen lips and blow slower for lowere pitches.

Or you can just tell the kids to blow harder for high notes and softer for low notes. That might satisfy them for a while...

HINT! Try using the big tongue depresser paddle pops too!

TIP! If your harmonica is not making a noise have a close look at the middle of the instrument (the area between the two pieces of paper). I learned while making them with the kids that the ones that work have teeny tiny gap between the paddle pop sticks. You should be able to see light through it.

 If you don't have a gap, there's no room for vibrations. If there's no vibrations, there's no sound. (Ohhhhh, science!). I like to make sure that at least one of my sticks is slightly bowed.

WARNING! This is a noisy craft! You may want to have a stash of ear plugs at the ready for children and staff that are sensitive to noises, as there will be a lot of it. Once a child has a harmonica and has figured out exactly how to play it, he or she is likely to play it for the rest of the day. Maybe it's best to send them outside to play directly after making them?


Enjoy! And don't hesitate to let me know what you think in the comments section!

Thursday, May 23, 2013

Braiding Disc Friendship Bracelets


Young girls love (as in LOVE) friendship bracelets. There's something about picking out coloured threads and actually physically making a piece of jewellery that they can where that just keeps them coming back for more. Young ones will love the hands on, look-what-I-made! factor, while the older girls will be able to do what they do best - sit and chat - while they're braiding. Plus it keeps them entertained for a good while, and isn't that just what we all want?

After a few weeks of watching the younger girls struggle to plait their three little strands, or making clumsy looking knotted lengths, I decided to turn to the internet where I found this lovely tutorial for Braiding Disc Friendship Bracelets. The tutorial is very thorough with easy to follow instructions and lovely, clear pictures, as well as a video at the end. But I'll just do a recap for the link lazy :D

The Supplies:
  • Sturdy cardboard (eg: cereal box)
  • 7 lengths of  yarn, 30-50 cm each
  • scissors

The How To:
  1. Cut out a cardboard circle.
  2. Cut 8 slits, spaced evenly around the outside of the circle, and a poke a hole (with the pointy end of the scissors is fine) in the centre.
  3. Knot the yarn together and thread through the centre whole in the disc.
  4. Set up the strings by slotting them into the little cuts you made earlier. There should be one left empty.
  5. This is where the braiding process starts: With the empty slot at the top, count down clockwise to the third string.
  6. Remove it from it's slot and press it into the one at the top.
  7. Turn so that the new empty slot is at the top and repeat until desired length is reached.
 
After a while the top will start looking like this:

And coming out the other side is:
 
 Hints and Tips:
  • You can use whatever kind of string/yarn/cord works for you. I've used satin cord I bought from the cheap shop for the photos here and it's looking pretty good if you want a length of rope. I've also had success with crochet cotton and embroidery floss.
  • If the loose ends get tangled (which they inevitably will) hold the disc in one hand and pull the strings up and out of tangle one by one.
  • Play around with the number of colours you use and the way you set them out to discover the different patterns you can make in your bracelet.
Enjoy!