Pages

Thursday, June 13, 2013

Paper Bag Puppets

So I rocked up to work one morning, and looked at the schedule. Beside craft it said "Sock Puppets." I thought that was incredibly cool. After searching the supply cupboard I realised, we don't actually have any socks... I consulted the coordinator and we decided we'd have to do paper bag puppets instead. She wanted to give me  the paper bags from the kitchen; you know, the brown ones. But early on in my time at the centre I'd noticed a stack of large envelopes sitting on one of the craft shelves. They've never been used. So I decided we'd use them to make puppets.

Best. Idea. Ever. (For that day, at least).

These envelopes just happened to have windows in the perfect position to put they eyes behind the window. "Ned Kelly Puppets!" my co-worker exclaimed from the kitchen when she saw the 'paper bags' I intended to use. And well, I didn't make Ned Kelly, but I definitely used the slit-in-the-helmet concept for the placement of my eyes.

Kids can do whatever they like with this craft. We had puppets with yarn hair and paper bows. We had puppets with googly eyes. We had puppets frills (like mine). Puppets with ribbon headbands. Puppets with flowers. Vampire Puppets. Girl Puppets. Boy Puppets. The sky is the limit.

Just stick it all on, draw the rest and slip it on your hand.

And the perfect technique to get younger kids to come and make one? Have yours made up in advance and get the puppet to do all the talking. Mine (despite looking very feminine) ended up with a Grover from Sesame Street voice. But it worked. I got three preps and a couple of grade ones to make puppets by asking them through the puppet.

What kind of paper bag puppet would you make?

Monday, June 10, 2013

Lets Go On Safari!!!

We recently had a safari themed week at work. Which essentially means that all our crafts and a few of our activities were safari related. It had mixed success in the craft department, some days being a flop and others being a big hit.

First, the flop. Giraffe puppets.

Sure, they look kinda cute, but generally speaking, our kids aren't into "colour this, cut it ou ad paste it to that" crafts. t leaves very little leeway for individual creativity. Kids love to come up with their own ideas and insert them into whatever they're doing. Being told to cut colour and paste is too specific for my craft hungry children. They would much rather choose items from the box monster and make whatever came to mind than make something as mind numbing as these giraffes.  That being said, there were a few younger children with enough patience (or boredom) to persevere. Mostly, they thought they looked more like cows than giraffes...

Next, a mild success.


We got these printouts from firstpalette.com. They're super cute and great for creative play after (I suppose the giraffes are too, for the right crowd). There wasnt a whole lot of interest in making them on this particular week, though I attribute this to the fact that we'd made similar masks just a couple weeks earlier (Everyone on staff chips in to help with programming, so it's inevitable that some things are occassionally repeated close together if their themes overlap slightly). The first time we did them they were a big hit. Kids were asking to make the animal masks for days after the craft was actually scheduled.

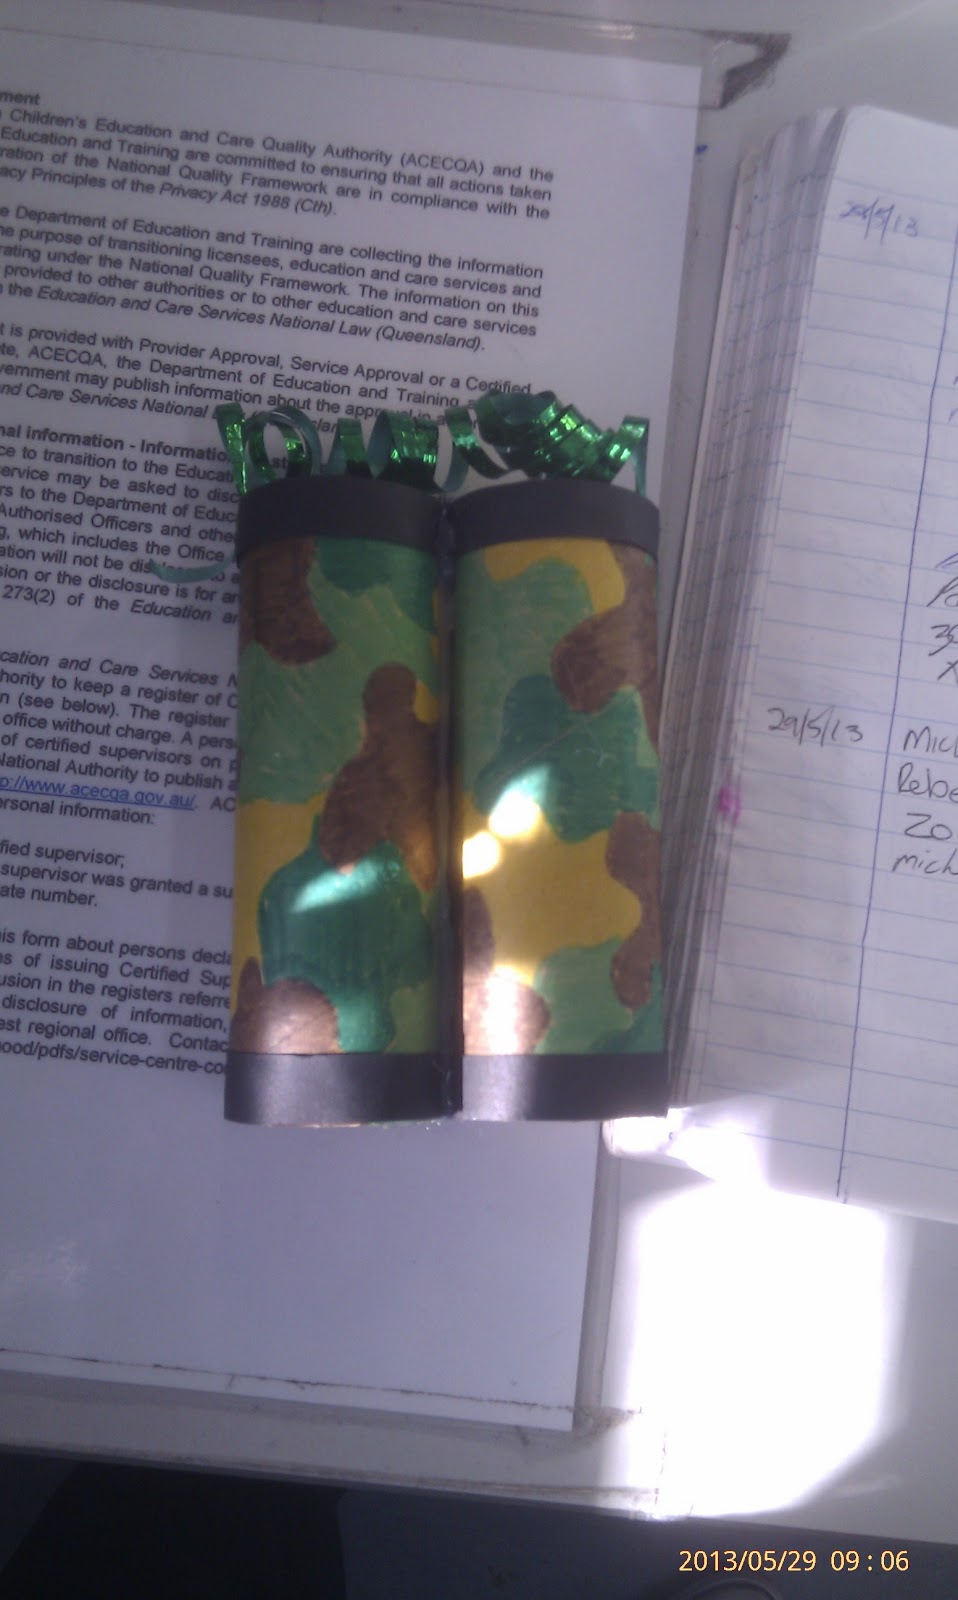
And finally the super duper success all the way from the African savannah!


Cardboard tube binoculars. Oh. Em. Gee. These babies were pop-u-lar!! We had probably 20 loo rolls in the drawer at the beginning of the morning, and I thought, oh yeah, that'll probably be enough. What are the chances of more than ten people wanting to make binoculars today? The answer to that mental question: very likely.

By half way through my two hour shift, all the tubes were taken and I still had kids coming up to me asking to make them. Kids that usually steer away from any form of arts and crafts because they would much rather be playing soccer or pretending to shoot at each other! Apparently, though, binoculars hold a certain appeal to this particular group of kids, as they were quite disappointed when I told them the best I cold do was roll up some paper and stick the tubes together.

It just wasn't good enough for them!


The kids who were able to make them, had an absolute blast racing around the room (to the disgruntlement of the staff who have been drilling into them that they need to walk in the room since the dawn of time) pretending to spot, and be chased by lions, tigers, monkeys, hippos, and crocodiles.

It also happened to rain on one of the afternoons, so we put on a movie for them to watch rather than going outside. And purely by coincidence, the movie was Madagascar two! What a great safari experience!

If you have some ideas that you would use for a Safari theme, feel free to drop them in the comments section. I'd love to peruse them all.

Thursday, June 6, 2013

Super Hero Owls

Spider Owl and The (Owl) Flash
This one is not so much something that we've done at work, but rather, something I decided to do in my own time and post here because it has great potential (perhaps with some modifications) to be applicable at work.

I designed some owls that had the main features of well known superheroes in my little ideas book and decided I might like to make them out of layered paper or cardboard. Awesome idea, I know. But when I looked at my stash of coloured paper and card there was a distinct lack of the appropriate colours. Except for Iron Man (pictured below). I hadn't really I wanted to outline each piece in the black, but it became necessary when I realised that the distinction between the read of his body and the red of his wings just wasn't there.


So there is idea number one of how you could use this craft: Create paper/cardboard owls. Perhaps to put on cards?

Undeterred by this minor set back in my plan, I decided to pull out the felt, recalling the utter cuteness of the Kokeshi Dolls we'd done at work. I did up some templates for the pieces of the basic owl which can be downloaded here. This does not contain all the piecess required for the superhero owls I have made (and planned) however, many of the pieces not included can be easily drawn up yourself.
So Here's What You'll Need:
  • Basic Owl Template
  • Felt in assorted appropriate colours for your owls
  • Embroidery threads that match your felts
  • Scissors
  • Cardboard
  • A pencil (I use a large 6B, but you may want a white pencil for the darker colours)
  • A needle
  • And Fibre Fill (stuffing)
Process:

  1. Print and cut out the pattern pieces. You may wish to glue the pieces to the cardboard to cut them out, or you can trace around the paper onto the cardboard to make the templates.

  2. Trace around the templates onto the appropriately coloured felt and cut out. Remember to flip the wing piece when tracing it the second time so that neither of your wings show the trace marks. Always place the traced side down when assembling
  3. Place the pieces together in the formation you wish to make
  4. Stitch the smaller pieces onto bigger pieces and then onto one body. (For example: I stitched the bat onto the yellow background before stitchin onto the back. I stitched the "pants" piece straight onto the base and then stitched the yellow belt into both. I stitched the eye pieces together and then stitched around the outer eye when attaching it to the body.) You'll need to use a small running stitch - simply up and down - for this.

  5. Once the front of the owl is assembled, attach it to the back using a whip stitch. To do this you will start at the wing tip, insert the needle through all layers of felt, pull all the way through, bring the needle all the way around to the same side you started at and repeat the action all the way around the top of the owl and down the other side until you reach the other wing tip, leaving a gap between the wings for stuffing.
  6. Stuff the owl. Make sure to get right up into the tips. It may be useful to use a pencil or scewer to aid in this step.
  7. Sew the opening closed using the same whip stitch and bind off.
Bat Owl

 Aaaand here's my Avenge-Owls all Assembled!
Avenge-Owls Assembled: Captain AmericOwl, Iron Owl, Owl Thor, and Hulk Owl
 
This craft would be good for a little sewing club for beginner sewing with the kids, or alter the composition slightly to make it friendlier for all children. And remember you can design your own owl characters. What about Disney Princess Owls? Or just your own owl characters all together!
 
Kid Friendly Alternative to Sewing the Peices Together:
 
Hot Glue. Yes. The faithful hot glue gun could easily be used to stick all the pieces together up to and including attaching the front to the back. Glue around the eadges of the back and attach the front by pressing it down, making sure to leave the gap. Once the glue is cool, have the children stuff it and then glue the remaining gap closed.
 
 
Remember, if you do this craft, I wanna hear about it! And see it!

Monday, June 3, 2013

Felt Kokeshi (Japanese Dolls)

(Note: Do not use regular felt tip colouring pens to draw details of your doll's face on as it leaves a smudgey, bleedy, five o'clock shadow type effect that I'm sure we weren't looking for.)

These little door hangers/bookmarks/companions are just so cute! We made these during our Japanese themed week, along with fans and other such things, and I just can't stop loving them.

All you need is an array of different coloured felts, scissors and hot glue. A template is highly recommended for the kiddies. We used something like this:
 Make the templates out of cardboard so that they're sturdy and won't bend when you try to trace around them. It's a good idea to have a bunch already traced out on the felt prior to the beginning of craft time especially for thos little ones that are still developing their fine motor skills.

Cut the pieces out, arrange them just so and hot glue them together. Allow the children the option of cutting out their own eyes and using googley eyes. Create some little flowers and hearts to adorn the girl's hair and kimono and attach a ribbon to the top at the back for hanging, and you're done.

Tips and Variations:
  • Use a colouring pencil or chalk pencil (like the dress makers use) to trace around the shapes onto the felt. Not only will a white pencil show up on the dark coloured felts, unlike felt tips there is no ink to bleed through and stain the fabric.
  • Add another piece of felt to the back of the doll, hot gluing around the edges only and leaving an opening at the bottom to turn the doll into a finger puppet.
  • Add a paddle pop stick to make a different kind of puppet.
  • Leave off the hanging ribbon and it would be a great addition to a felt board collection.
For more Kokeshi inspiration check out This Pinterest Board